 Company:
The Minnesota company designs and manufactures a unique line of small electrically powered watercraft inspired by the enjoyment of personal recreational experiences up-close in the land of 10,000 lakes.
Challenge:
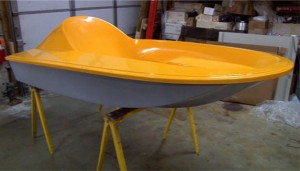
The small fiberglass boat was designed and prototyped by hand, which meant that it was not totally uniform and symmetrical.
As the company was preparing to scale up production volume, their suppliers began requesting CAD data of the deck and hull so they could precisely make and fit ancillary parts for it. Having a 3D electronic representation of the craft would vastly improve dialog with suppliers and vendors.
Plus the ability to reverse engineer the boat from digital data was essential for the higher level manufacturing processes the company would employ in the future. Because the body of the boat was a complex shape with many free-form curves and surfaces, hand measurement would have been difficult even with detailed 2D drawings, much less precise and thorough, and much more time consuming.
The recurring issue of not having a CAD model compelled the company to contract an engineer who had CAD skills. The engineer immediately recommended that they have the boat 3D laser scanned at Laser Design Global Services, a leading provider of ultra-precise 3D scanning services.
The account manager supplied us with the knowledge and understanding of the deliverables we needed to confidently move forward in manufacturing our product. He figuratively held our hands and walked us up the learning curves of 3D scanning and CAD modeling.”
Solution:
The Laser Design account manager discussed the 3D scanning technology thoroughly with the company owner who commented, “The account manager supplied us with the knowledge and understanding of the deliverables we needed to confidently move forward in manufacturing our product. He figuratively held our hands and walked us up the learning curves of 3D scanning and CAD modeling.”
To facilitate tweaks and updates to the hand-made design, the company decided it needed a parametric model that could be revised and edited (rather than a non-parametric or “dumb” model that could not). “Our account manager explained the pros and cons of each approach, dumb vs. parametric modeling, including the cost/benefit trade-offs of each,” continued the owner. “He did a nice job of laying out the alternatives so we could make well informed decisions.”
A major challenge in converting a hand-made as-built fiberglass prototype into a manufacturable product is bringing the geometry back to its design intent. The editable parametric CAD model would allow company engineers to create uniform wall thicknesses and perform tests on the design to ensure its quality and functionality. It would provide the data needed to make exact copies of parts and to aid the development of tools that enable a higher level of manufacturing in greater quantities.
The company decided that only the outward-facing side of the deck and hull needed to be captured, so the parts were bolted together and scanned as an assembly. With the external profile data, uniform wall thicknesses could be constructed in the modeling process.
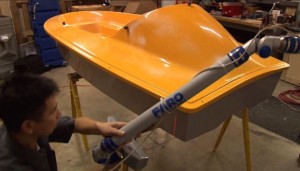
Laser Design engineers scanned the fiberglass craft using the Laser Design FA system with the 10’ Platinum FaroArm® and the SLP-2000 line laser probe. The SLP-2000 offers a super-long 240mm (9.8”) laser line for faster scanning with better coverage than most handheld scanning systems on the market today (0.0029” accuracy). The set-up and scanning took just 3-4 hours.
The laser scanning system projects a line of laser light onto all of the part’s surfaces while cameras continuously triangulate the changing distance and profile of the laser line as it sweeps along. Non-contact scanning means that the problem of missing data on a complex free-form surface is greatly reduced.
The system measures fine details so that the object can be exactly replicated digitally. Laser scanners measure articles quickly, picking up to 75,000 coordinate points per second, and generate huge numbers of data points without the need for special templates or fixtures.
The laser scan reproduced the part profile completely and precisely in the coordinate point cloud. The native software (Surveyor Scan Control) automatically connected the data from multiple views into a common coordinate system in a single 3D scan file. After the scanning was complete, the raw data was processed and refined with Geomagic Studio. The processed data was then modeled into a symmetrical parametric CAD model in SolidWorks. Delivery was promised in 8-10 days, but actual turnaround time from quote to model delivery was just 4 business days.
Using touch measurement technologies to capture the boat’s curved irregular shapes would have taken much longer and produced a much less complete data set. Measurements taken by hand would have been sparser, never really capturing the totality of the shape. Without non-contact laser scanning, this type of exact true-to-life shape replication of hand-made prototypes would be virtually impossible.
Results:
The parametric CAD model in SolidWorks was delivered within the week. Since the company was local, the account manager and scanning engineer conducted a debriefing session for the company owner and engineer to effectively transfer the knowledge acquired in the scanning process.
“This debriefing session was very valuable for our engineer to learn more about the reference planes, cross-sectioning, and dimensional lines used to manufacture a product
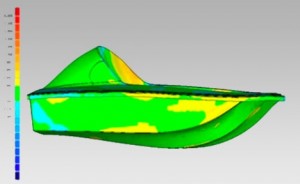
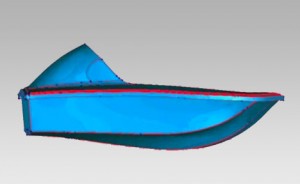 from a CAD model. Since our product had been a hand-made prototype, this type of information was an essential step in our transition to the higher level manufacturing required for large volumes.” The differences between the raw scan data and the CAD model were evident; the imperfections in the prototype were corrected back to their design intent in the smooth model.
The next step in the development process will be to analyze the design in CAD and make digital “prototypes” to try out various improvements without having to actually make different physical versions of the product. This will help immensely with designing add-ons and assemblies, and facilitate discussions with upline parts’ suppliers. And every change is documented in the software and can be referred back to at any time.
 “It avails us at this point in time to use higher technical approaches to deal with our suppliers and vendors; it improves our estimating process,” said the company owner. “As we expand production and grow the company, we need to use the best technologies available to create our product. Ultimately, updating our knowledge base and processes with laser scanning from Laser Design helps us project a more favorable impression of the company’s competence and professionalism to our investors, customers and suppliers.”

