 A moldmaker wanted to re-qualify used molds to see if they needed refurbishing, and if so, where to make the corrections. Find out how the ROI of 3D scanning was determined.
PREVIOUS METHOD: Manual Hand Measurement
- Time: 10 weeks to complete one part + production time
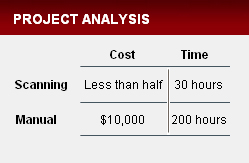
- Cost: Approximately 200 hours at $50/hour = $10,000
- Method: Gages and instruments are used to manually measure the mold’s dimensions and locations. The measurements are compared to the 2D drawing and a report of discrepant items is generated. Then, engineers decide which of the discrepant items were due to processing of the mold and which had to be corrected in the tooling.
NEW METHOD: High-Speed 3D Scanning
- Time: 2 hours to scan each part + time for generating inspection reports = 30 hours (3-4 days)
- Cost: Scanning each mold, plus detailed iterative inspection and reporting process to final documentation = Less than half the cost of the Manual Method
- Method: 3D scanning expedites parts’ production exponentially. A color-coded inspection report (or point cloud data for CAD modeling) is quickly generated that provides more information about the part’s acceptability.

How Else Did the Company Benefit from 3D Scanning?
Based on the scan data, the moldmaker could quickly be certain that the new refurbished mold met the criteria of the 2-D drawing and the acceptable standards. The digital scan data also allowed the moldmaker to correct the CAD model, so that it matched all the dimensions of the drawing. Future inspections will be fast and efficient because the scanning setup is saved as a template so when the same part is inspected, it is immediately available. Molds can be qualified in just hours and at regular intervals by laser scanning inspection techniques. Not only did the customer save time with 3-D scanning, they also saved over half the cost of manual measurement.
Choosing the Right Laser Scanning Inspection Technique
Two main factors should be considered when scanning molds: size and accuracy.
1. Size consideration
- If you need profile data of your small to medium-sized part, laser scanning on a fixed system with a high-accuracy probe yields the best results.
- If you need profile data of large parts or onsite scanning, a portable arm-based laser probe suits your needs.
- For internal cavity scanning on parts that cannot be damaged, CT scanning provides complete detailed external and internal data.
2. Accuracy consideration
- A service bureau should be able to provide cost-effective scanning options depending on the size and accuracy requirements of the job—using the highest accuracy system and probe is not always necessary. Lower accuracy scanning probes reduce the scan time while providing adequate and reliable data economically.
Service Provider Selection Tips
Selecting a quality service provider for your laser scanning project is essential in obtaining accurate, usable data for your inspection application.
- Experience counts: Look for a service provider with years of experience who guarantees their results and has successfully performed demanding, complicated projects. As the customer, you may not know exactly the best solution for your job and a service provider with a broad range of experience and tools can give you optimal results at the lowest cost.
- Equipment counts: Make sure your service provider uses high-end quality equipment and no low-end, low-accuracy scanners. Choose a provider backed by a broad range of portable and in-lab scanners and expert metrologists working in temperature controlled labs who use the latest digitizing and software technologies available form both contact and non-contact measurement.
- Customer service counts: How fast is the turnaround time for projects? Are account managers easy to contact and return communications? Your supplier should provide fast turnaround on most projects—2 to 3 days—and project managers who answer queries within 24 hours.
- Understanding your project counts: The results of laser scanning run along a continuum of relatively simple to extremely complex model formats. Cost, time and level of communication required increase along with the complexity of the results desired. Building understanding between customer and engineer is an extremely important step in the scanning process. Customers should always be asked what they will be doing with their CAD files, so the service provider can offer the correct level of complexity and file format.
