Manufacturers in every day and age have jockeyed for the coveted first-to-market position in introducing their ground-breaking, innovative products to the public. Today more than ever, speed and quality give product manufacturers the competitive advantage. Reducing time to market with 3D scanning creates the biggest opportunity to increase bottom-line profitability.
Many industries are now benefiting from the increased speed of 3D laser scanning along with traditional metrology methods to significantly reduce the time required for first article inspection of their products. However, 3D scanning can speed up many other steps in the product development life-cycle as well to bring items to market much faster for added profitability.
Several opportunities where 3D laser scanning can be used in the product development process to speed the time to market include:
Prototype Development
In developing a product, a designer may have several prototypes reflecting different approaches to fulfilling the functional design intent. Scanning each can quickly determine which of these designs are an accurate depiction of the design intent. The scan data are used to conduct a form analysis between the original CAD model and the prototypes. This allows the designer to see whether the key functional features meet the design’s needs without taking any linear measurements or having to generate a complete inspection report which takes valuable time. If the critical geometry is not correct in a model then there is no need to waste time measuring the rest of the part.
Material/Process Selection
Once the geometry is verified and the initial tooling fabricated from the 3D model, various materials are usually considered to meet the required performance characteristics. Using the same form analysis method with the scan data, deviations caused by process issues or material characteristics can very easily and quickly be found.
The form analysis step also presents a great opportunity to “fine tune” the fabrication process to eliminate these deviations in molded or cast parts. The key element is not that a particular feature is dimensionally incorrect, but rather where the deviation occurs. Can changes to the molding/fabrication process be made to correct the problems? For example, the heating or cooling cycle could be altered or the gating could be changed. Perhaps the cycle time is causing the deflection, or maybe there are differences in shrink rate or cavity-fill rates. In stamping or metal forming processes, form analyses can easily detect deviations such as camber, twist, burrs, and shear locations, allowing the fabricator to take remedial steps. Sharing the 3D results with the manufacturing department can reduce the number of trials and changes can be made right on the factory floor.
Taking inspection to the factory floor is a recent innovation, made possible by using portable laser scanning devices combined with a portable scanning arm. The laser scanning creates a CAD model on a connected PC with 3D analysis software, allowing for inspection in real time. This setup eliminates the time required to send physical samples back for inspection which can seriously impact the release date of a part. Finding deviations and repeating the measure/send/correct/re-sample cycle can be accomplished on the spot, and corrections to tooling can be made immediately. Getting it right the first time by shortening the development and inspection cycles results in faster time to market and hence more profitable days once the product is ready for sale.
 Functional Analysis
Parts generally pass or fail an inspection based on an evaluation of all the dimensions required to fabricate the part. Usually this is an unnecessarily stringent inspection standard; most parts have only a few dimensions and features that determine whether it will function as it was intended to or not.
Because the inspection process has used only linear measurements in the past, many parts failed and were rejected even though they would have performed quite well. 3D laser scanning can help resolve this dilemma by using functional datum or feature alignment. Defining a datum at the location of contact between mating parts or at the axis of a rotation center and measuring from that functional feature allows for a more meaningful evaluation of how a part will perform when in a relationship with other parts.
Surprisingly, very few of these key locations actually control how a part either fits or functions. If these crucial dimensions are not correct, the rest of the part need not be inspected because it will not function as designed. For example, if a part has 100 dimensions, but only 10 are functionally critical, inspection time can be reduced by 90% with minimal risk of having a bad part.
 Part-to-Part Comparison
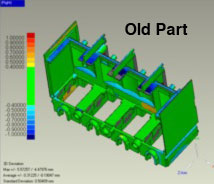
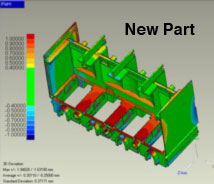
In the process of creating a new part, many elements can change: fabrication methods, material improvements, suppliers, or just the natural changes that occur over the life of a tool. Perhaps a certain part was acceptable and has functioned in the past. When updating the part’s design or refurbishing its tooling, however, a manufacturer must know quickly whether the new version of the part will function as well as the old.
3D scanning is the go-to tool for drastically reducing time to market when determining acceptability of a new part. The new part is scanned and compared to the stored scan data of the original part by superimposing it over the old model to look for changes and out of spec measurements or features in critical areas. The scan and comparison process takes less than 10 minutes, and all the measurements are three-dimensional rather than linear, leading to more accurate and faster quality decisions.
