King of the Problems
If you’ve ever attended an Artec demonstration with Laser Design before, you’ve probably heard a common phrase describing what happens if you make a very mild mistake during scanning: “Fix it in post”. Originally meant for filmmakers who opt not to re-shoot but instead add special effects in post-production, the phrase takes on additional meaning in the 3D scanning world. Just as the film needs some love before reaching the silver screen, 3D scan data must go through some deliberate post-processing to fix any accumulated errors that may add up during scanning.
Movement during a scan is one of the most challenging problems to fix because it is hard to predict exactly where and how the movement is occurring. This article will cover techniques and workflows for how to identify and fix motion for a part during scanning.
Expect the Unexpected
For this example, we will be using a toy Godzilla which has articulated hands, legs, body, head, and tail joints, and it will be 3D scanned with the Artec Space Spider 3D Scanner. When standing upright, the only features that are not visible are under the feet and the tail as they are contacting the ground. Everything else – under the arms, under the chin, inside the mouth – should be visible from a standing/upright position. In order to scan under the feet and tail, it would need to be flipped at least once.
Although somewhat stiff to maintain a shape when standing upright, there is enough wiggle in the joints such that flipping this part will definitely cause the tail and other segments to change positions and sag. This is a case where gravity itself causes the part to change shape when moved to different positions. The more you can anticipate this, the easier the scanning process will be.
In addition to expected movement such as the tail, there’s also the risk of unexpected movement. The legs on this part feel stiff and rigid, but there’s a chance they may slightly move when flipping on its left or right sides. It’s important to sometimes do a test flip and feel and see for yourself how rigid the part is.
An example to consider is when using blue tac or Play-Doh or clay as a fixture to hold a part in. Putting a heavy part In clay, like a screwdriver, may cause it to imperceptibly sag, during scanning, and is something to look out for: slowly sagging over the course of 20-30 seconds. A simpler example is when you push a candle into a birthday cake, and the sponginess of the cake moves the candle slightly over the next few seconds.
It may not be possible to anticipate when unexpected movement happens, but it should be possible to know it might happen if you think about the part material and composition. With this in mind, the strategy here will be to scan nearly everything in a single top side position, and then scan everything else safely in as few other positions as possible. After some test flips on this part, it seemed that the only movement expected to happen was in the tail, but we ought to expect the unexpected.
Special Tactics
With the pitfalls of movement (predictable AND unexpected) identified, it’s time to scan. The only set up needed is a wooden Lazy Susan turntable with a pattern printed and taped on top. This simple turntable color pattern will allow the registration to work perfectly even if mistakes were made during scanning.
Here is the list of the total number of positions that were scanned:
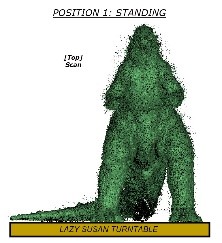
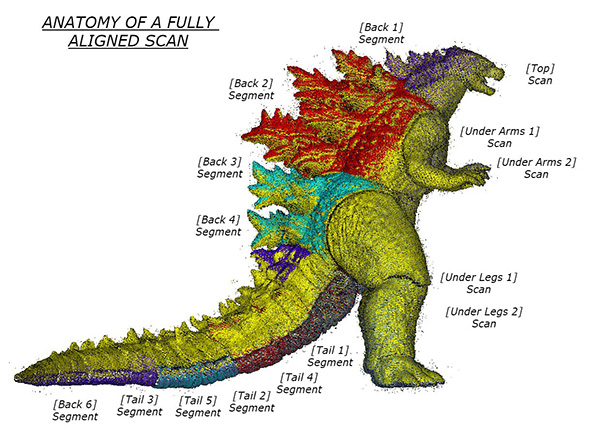
| Position 1: Standing | 75%+ of the part was scanned in this standing upright position. I did not know it at the time, but I missed some areas in the dorsal fins and would need to revisit this area later. This first single scan was labeled [Top] |
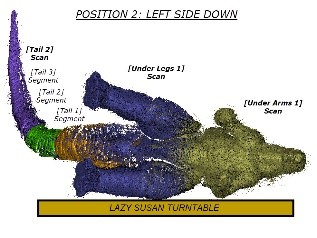
| Position 2: Left Side | The second position was flipped on the left side. 3 total scans were taken while on the left position and were named [Tail 1], [Under Legs 1], and [Under Arms 1]. As expected, the tail moved, but the arms and legs did not. I scanned 3 areas separately because I expected some amount of movement and having these isolated in the raw data seemed to save some time during processing |
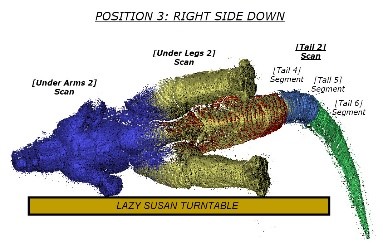
| Position 3: Right Side | The third position was on its right side. Same results as before: the legs were the same, but the tail moved again (now up to 3 tail positions now). New scans were labeled [Tail 2], [Under Legs 2], [Under Arms 2] |
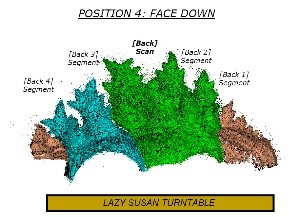
| Position 4: Face Down | After the right-side position, I reviewed my data before putting away the scanner and noticed a problem. I missed some spots on his back in between the rows of dorsal fins. The part was then flipped to be face-down and a new scan was labeled [Back 1] |
 |  |
 |  |
[Top], [Tail 1], [Tail 2], [Under Legs 1], [Under Legs 2], [Under Arms 1], [Under Arms 2]
With scanning seemingly complete, the full list of scans was:
The first step to successful processing would be to run Global Registration on each individual scan. Why? Because each individual scan could be considered its own unique position, each containing the turntable pattern it was scanned on. It is always best to maximize the utility of the turntable pattern before deleting it, so for each scan, global registration was run first, and only afterwards was the turntable deleted using the eraser.
Next, it was time to align. Using the [Top] scan as the registered one, the remaining 6 scans were each aligned one at a time. It was at this point that evidence of movement became visually obvious. Immediately, it was clear to see the tail had sagged, causing the 2 tail layers to visually look different from the rest.
Some unexpected movement occurred in the body segments. 4 body segments to be exact. After noticing my mistake and setting up in position 4, the body segments moved slightly, and even though the missing areas were scanned, a new cluster of unexpected movement would need to be fixed.
In this case, we are starting off with data that contains unforced errors! It is true to say it is always a risk to proceed to processing without re-scanning when you notice a problem, however Artec Studio gives us all the tools we need to “Fix it in post”. It is most accurate to say proceeding is a calculated risk, but one that pushes you to advance your understanding and skill with the software.
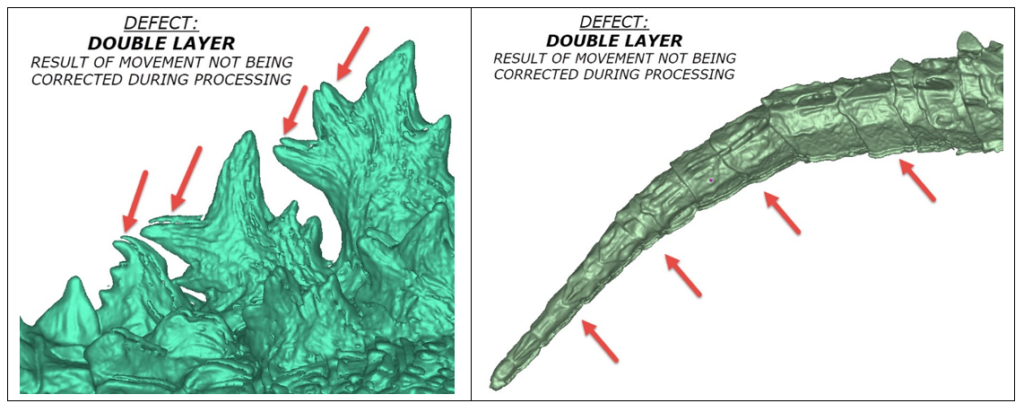
The [Tail 1 and 2] and [Body] scans all contained movement, so we need to count each segment that moved. For the tail, there were 3 different segments that moved while the others stayed still, and the body contained 4 segments total and each moved slightly.
To fix this, we need to isolate each segment and realign them individually back to the [Top] scan.
The order of operations to isolate and realign is as follows:
- In the workspace, right-click and Duplicate [Tail 1-2] 2 times (resulting in 6 layers, 2x each for all 3 tail segments). Rename duplicated scans [Tail 3-6]
- In the workspace, right-click and Duplicate [Body] 3 times (resulting in 4 layers, 1x each for all 4 body segments). Rename duplicated scans [Body 2-4]
- Use the eraser tool to delete all but 1 segment from the tail. Do this for [Tail 1-2], [Tail 3-4], and [Tail 5-6] such that each group of scans contains 1 tail segment each.
- Use the eraser tool to delete all but 1 segment from the body. Do this for each [Body 1-4] scan such that each body scan contains a single segment
- With each segment isolated and saved and labeled its own layer, run the Align tool to align everything relative to the combined [Top] Scan. Each segment should pop satisfyingly into place during the Align step
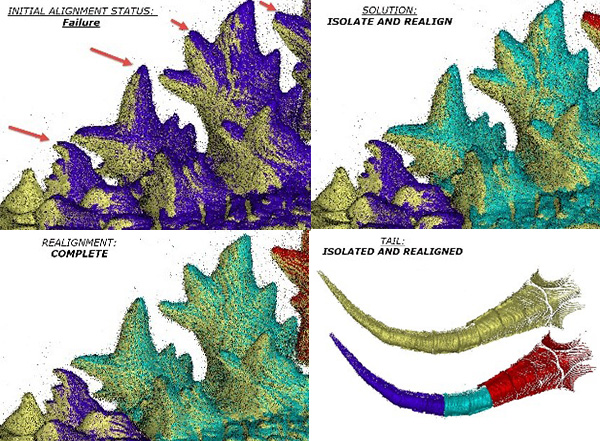
Once alignment is complete, the project can proceed normally. Global Registration can be run on everything with the tail and body segments included in their new, realigned positions. Afterwards, sharp fusion can be run at the highest settings to leverage all the work we put into correcting the movement!
When scanning an inanimate object like this, you can generally count on rigid segments moving like links in a chain: the overall shape is made of rigid subcomponents. If you can align each subcomponent individually, they can all be digitally aligned back to a master scan of the entire chain. This process is very similar for correcting motion during human body scans, however it is different because human bodies breathe and change shape during scanning, so this will be covered in a future post.
Happy scanning!
