Project
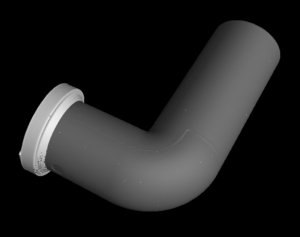
Injection molding is a manufacturing process for producing parts in large volumes. Before moving into mass production, engineers must feel confident in their product because they are investing both time and money in tooling and injection molding for the volume of parts they want. The coupler “elbow” pipe shown below is a connector part for an irrigation water system. It is currently in the earlier stages of design development before the product hits the market. To ensure the highest success for this design concept, our customer was creating prototypes to test form, fit and functionality. The prototyping process took a pause as our customer found an issue with many elbows leaking and could not determine root cause or specific locations of the leak causing defect within their parts.

Challenge
For the customer’s root cause analysis, one of their biggest challenges was to verify where the part is defective (leaking) without destroying the part. Additionally, critical 2D and 3D dimensions needed to be measured to understand potential causes of the leak and time was of the essence.
Results
Using the RX Solutions, EasyTom Computed Tomography (CT) Scanner, Laser Design engineers were able to capture thousands of digital 2D X-Ray slices (images) showing both external and internal details of the part. These 2D images are stitched together to form a 3D data set that can be analyzed and interrogated to learn about the form, dimension and quality characteristics of a part. In this case, the part was measured with voxel (3D pixel) resolution of just under 0.003”. For reference, a human hair diameter is 0.004”. Using the EasyTom CT Scanner, Laser Design engineers were able to capture almost 2 billion voxels of information on this single component for 3D measurement and analysis purposes.
With this vast amount of data, a small crack was identified on the inside of the part that was not visible when looking from the outside. The crack measured at 0.008” width and led our customer to believe that there could be concerns about the wall thickness of the overall part. After performing a wall thickness analysis using the Volume Graphics software, it was determined that the thickness of the part in the location of the crack was out of tolerance by about 0.070”. This method to check wall thickness did not require a nominal 3D CAD model, and helped guide the customer to identify other symptoms of issues. After measuring, the ends of both pipes showed to be out of roundness by over 0.010”. Not only can these measurements be captured to help define next steps, but the data and issues can be visualized and communicated easily using the Volume Graphics Analysis software.

Crack Location and dimension. Wall Thickness check.

CT Data of Pipe Roundness
Benefit Summary
Using the Rx Solutions EasyTom CT Scanner, along with Volume Graphics Studio Max software by Hexagon, the Laser Design team provided vital measurement data inside the pipe elbow to assist the customer with important steps in their root cause analysis. This data was captured without destroying the part and gave access to internal and external surface geometry along with material structure information. Given the high-resolution 3D scanning capabilities of the EasyTom CT Scanner, the smallest defects were able to be located and critical dimensions checked, helping the customer move to the next steps of their root cause analysis work. Once the part was scanned, this data was made available to the customer within a day and their team was able to make decisions immediately upon review with the Laser Design engineer.
*Trademarks are owned by their respective companies.
