Movement in Body Scanning
If you’ve ever attended an Artec demonstration with Laser Design, or read our previous blog on correcting for movement, you’ve probably heard the phrase: “Fix it in post”. In the 3D scanning world, this means small mistakes can be made during scanning, but they will be fixed during post-processing. For example, a heavy-duty Artec carrying case with a hinged handle will contain two rigid subcomponents: the case, and the handle, and when flipping the case upside-down, the rigid handle might change position. Artec Studio fixes it in post by separating the handle from the case, registering their positions independent of each other, re-aligning back to a corrected position, and the result is a corrected, unified model.
But what if the part being scanned isn’t rigid? A plant blowing in the breeze, a soft clay sculpture slowly deforming under its own weight, or a living, breathing human being? Without identifying rigid subcomponents, Artec Studio cannot correctly separate them, and it cannot accurately realign their positions. In short: “failure”.
Not all is lost. This blog will cover techniques and workflows for how to identify and fix motion for a 5-year-old child during scanning.
For this example, we scanned a very energetic 5-year-old, Ana. Ana’s face, hands, and head needed to be scanned using the Artec Eva. Being a tough negotiator when entranced by something as cool looking as a 3D scanner, Ana could not be compelled to stay perfectly still. This being the case with so many human body 3D scans, we anticipate movement will occur during scanning and have solutions ready to solve for these situations.
Here is a short list of pitfalls, best-practices, and important considerations when scanning a human being, specifically a child:
Pitfalls:
- Scanning on a cushioned or bouncy surface like carpet or a couch will cause extra movement, and the floor cannot be reliably used for alignment
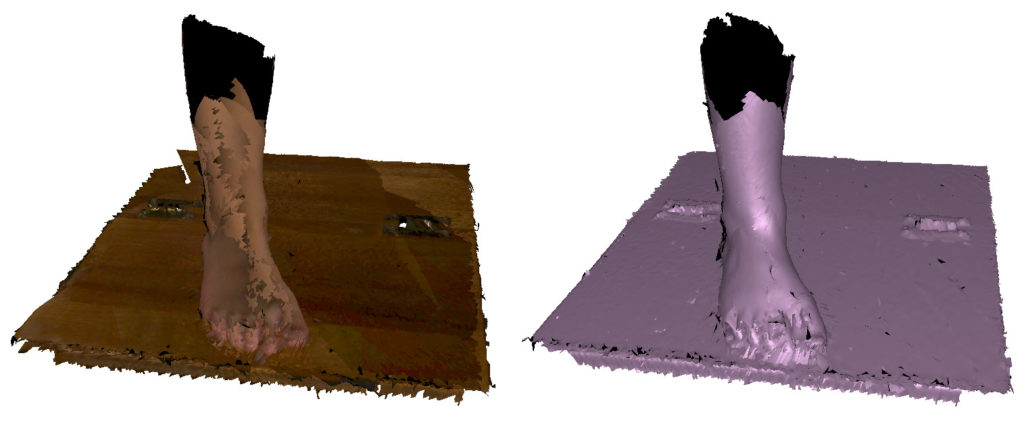
- Scanning on a single-color surface will result in scan data registration being overly reliant on the shape of the body itself, which is constantly moving, and be unable to leverage texture (color) for alignment
- Try this: take a deep breath in, hold for a second, and then breathe out. Did your shoulders rise when you inhaled and drop when you exhaled? If so, this common behavior by most people (to expand their chest when taking a deep breath) causes a change in relationship between the head and shoulders and chest – critical areas for any sort of face or bust scan! Avoid asking someone to take a deep breath before 3D scanning; instead try to breath normally but lightly. Or, ask to puff out their stomach when breathing in, so their chest stays still.
Best Practices:
- Stand or sit on a solid surface
- Take a few practice scans first
- Don’t be afraid to try again later when the child is more cooperative
- Take multiple scans as backups
- Either scan on a patterned surface (like a wood grain pattern) or place a grid of stickers/strips of masking tape, or simply draw a pattern on the floor with a marker or chalk.
- Set up a display monitor in front of the child with the software display mirrored on it. This will keep the child’s eyes and attention in a single forward position as much as possible
- Recruit a helper or assistant to manage the child’s wants and needs in between scanning (promises of ice cream may not always work) to maximize success and minimize time
- When scanning feet, stand in a stable position, feet shoulder-length apart, and keep an eye out for the toes changing position as weight is distributed during scanning
- When scanning finger’s consider wedging small cotton balls or clay in between the knuckles to allow some spacing/separation that remains constant during scanning

Raw 3D scan data of foot on tabletop surface with wood grain texture
Important Considerations:
- Try this: pretend to curl a set of invisible dumbbells. Notice how your biceps and forearms dramatically change shape, but your wrists and hands stay mostly rigid? When trying to scan a specific area, try to anticipate what part of the body is most likely to remain still, and what part of the body is most likely to flex and change shape.
- Speed is vital to success. The longer the scan, the more chances that subtle movement turns into obvious movement, meaning at a certain point, an extra 5 seconds of scanning might mean require an extra 5 minutes of data processing. Sometimes less is more.
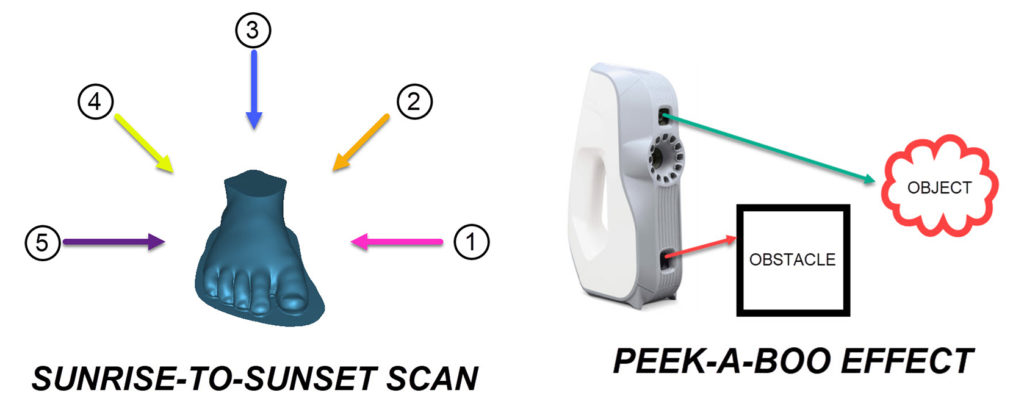
- Practice “Sunrise to Sunset” scans where your scanner path makes a complete 180 degree arc, to ensure the fastest and most efficient scan path that captures the most detail (such as in between the toes). Combine one sunrise/sunset scan with one 360 scan to capture the most area in the fastest time
- Consider the “peek-a-boo” effect where the bottom 3D camera on the scanner is blocked by some obstacle while the top projector flash is unobstructed – the result is a failure to capture data. Turning the scanner 90 degrees in your hand can sometimes resolve obstructions like this.

With the pitfalls, best-practices, and important considerations in mind, it’s time to scan.
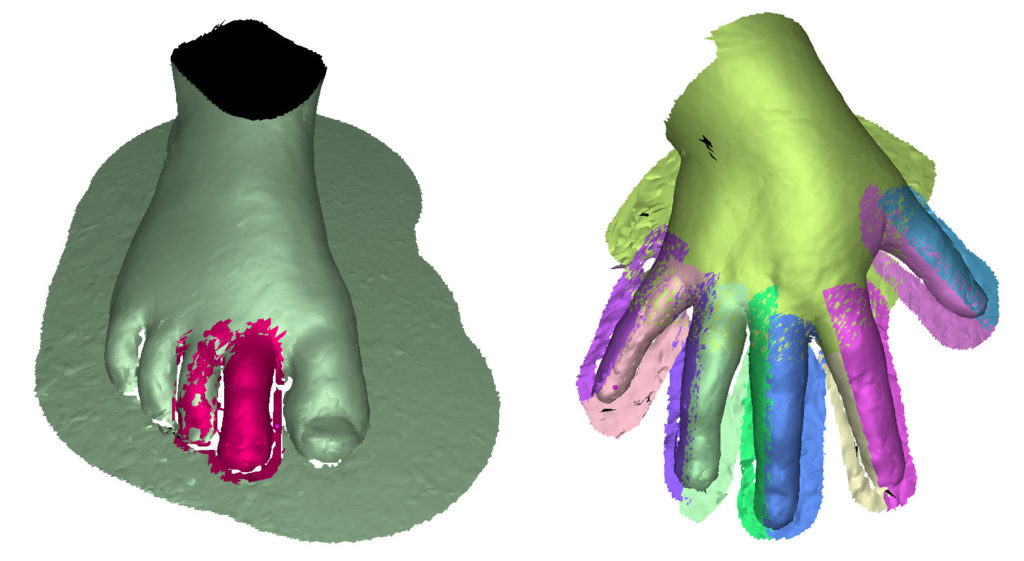
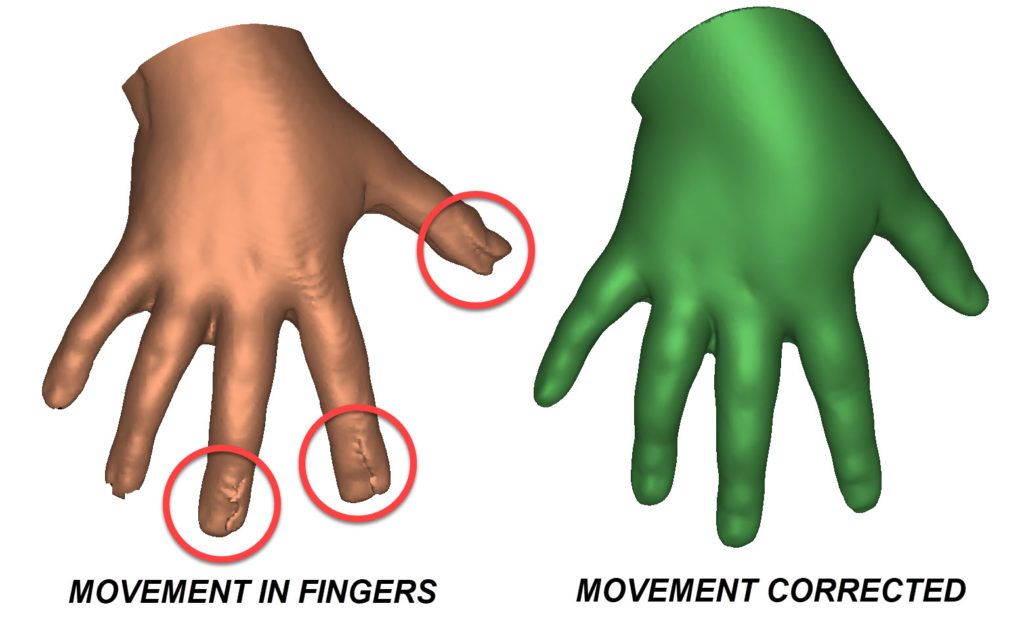
After scanning is complete and when starting data processing, right-click and “duplicate” the scan layers that experienced movement into multiple different copies. Each copy can be renamed something appropriate such as “index finger”, “middle finger”, etc. This is where you should use the eraser tool to select only the area you want and erase the rest. This leaves a single layer dedicated to a single feature that will be corrected for movement. For complex movement where a finger moves and causes the musculature to slightly change, further subdivisions can be made, such as “index-left” and “index-right”. Subdivide the scans using the duplicate layer technique as many times as necessary.

On each new layer of scan data, global registration should be done on very high settings (key frame ratio = 0.6 or greater) to ensure the tightest possible fit. If things do not work, consider including a few extra centimeters of extra space around the fingers in each duplicated layer to include more unique color data to use for registration. After each feature is individually registered, use the Align tool to re-align each layer back to the main one. If this is done correctly, you will see a high degree of color-blending in the area where one scan meets another. Any need for further subdividing the scan can be revealed when zooming in on the new layers of data, and any that sticks out above the rest may have movement that still needs to be corrected.

(Left) Fixing two toes that move; (Right) Fixing all fingers and thumb that move
Once alignment is complete, the project can proceed either normally, where Global Registration can be run on everything in their new, realigned positions, or sometimes Global Registration after the new alignment can be skipped entirely, it depends on the complexity of the movement. Afterwards, the fusion (smooth or sharp) should have zero to no movement-related defects.

When scanning a living person like this, you generally cannot count on rigid segments moving like links in a chain where the overall shape is made of rigid subcomponents. Instead, special consideration is needed for the setup and processing, including more subdivisions of the scans than would normally be needed. With most things, practice makes perfect, and when practicing on a living body, you know there will always be subtle movement, so this is a key skill to learn early.
Sketchfab Samples
View the full Laser Design Sketchfab page >
If you have the Sketchfab App, you can view our models in AR or VR on your mobile device.
Note: not all models are AR/VR ready.
View our Sample Files Library for more 3D files and examples.
Happy scanning!
