 As featured in IEN magazine
Precise scanning and measurement via simplified processes can help reduce costs and time-to-market.
Achieving increased speed throughout the product development cycle and improving time-to-market is a constant struggle for manufacturers. As companies continue to examine ways of enhancing workflows, Greg Hetzler, Director of Engineering at 3D scanning and measurement systems provider Laser Design, Inc., a subsidiary of of CyberOptics Corporation, takes a look at part scanning and inspection within the overall production schedule.
What are some examples of how new industrial part inspection technologies can keep manufacturers competitive?
Be it for aerospace, automotive, medical devices or consumer electronics. there’s a shared aim to minimize overall production costs and decrease manufacturing times to ensure time-to-market goals are achieved. For companies to achieve these goals it’s about looking beyond the manufacturing stage and across the end-to-end workflow – from design through to delivery. Efficient quality assurance processes, and within that, industrial parts inspection, is essential.
Why has 3D scanning and measurement grown amongst manufacturers?
The win comes from any system that not only fulfills the actual functional requirement demanded of it, but also delivers the essential information accurately, quickly and via a user-friendly process. Recent advancements in 3D scanning and inspection have made it possible to overcome the challenge of achieving speed, simplicity and accuracy simultaneously.
To that end, if you’re a manufacturer, it’s definitely worth doing your homework and researching the latest systems. By doing so, you’re better placed to ensure that any investment not only meets today’s needs, but also those of tomorrow.
How does your own technology address the needs that you’ve outlined?
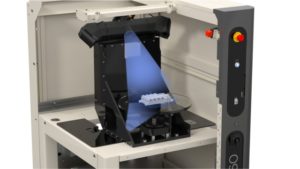
When it comes to the scanning/inspection requirements of our customers, we’re tackling some of the most difficult 3D shape manufacturing applications in the world. Our latest generation CyberGage360 is a faster, metrology-grade, one-button, automated 3D scanning and inspection system. With no need for complicated programming, it’s not an exaggeration to say that anyone could be trained within one hour.
The CyberGage 360 conducts a 360-degree 3D scan of complex parts, accurate to seven microns (0.007mm+ L/10000), while automatically generating a full 3D inspection report in three to five minutes. During the process, the system collects 10 to 20 million data points (XYZ coordinates).
The system uses our proprietary Multi-Reflection Suppression (MRS) 3D Projection Scanning technology, which accommodates for surface reflectivity/color and various noise-generating problems typically associated with 3D non-contact scanning inspection technologies. By suppressing the distortions in the surface characteristics of the parts under inspection, we’re able to deliver more precise 3D scan data.
Once generated, the report provides comparison data back to the CAD model, along with full geometric dimensioning and tolerancing measurement information – essential for parts analysis prior to production.
How does it save time?
Its’ fixtureless design. There’s no need to mechanically affix the part or for the user to turn it over during scanning to capture both top and bottom geometry. The system rotates the part to scan from various orientations, collecting all data.
The ability to access essential data in just a few minutes enables any necessary design changes to be applied much more quickly. This in turn supports the drive to get products to market faster. At the end of the day, from my own company’s perspective, it’s about achieving the nirvana of highly precise scanning and measurement via the simplest process imaginable. By doing this, we’re effectively reducing the cost of quality for our customers.
